I am working on some more "Halloween Stories" to share with you. Meanwhile, here is a skeleton that I drew for the
glamkids to make and thought that somebody out there might want to make these for their
ghoulchildren also. Just right click on the image and save it into one of your files on your computer. (I know most of you already know how to do this, but someone had to tell me once...)

I included a blank head just in case there are some
artists who don't like to follow a pattern.

You only have to copy each page
once EXCEPT the bones below need to be printed
twice since two bones are needed for each arm and each leg. (cardstock works best)


Have fun! I'd
LOVE it if you sent me a photo of your creations!
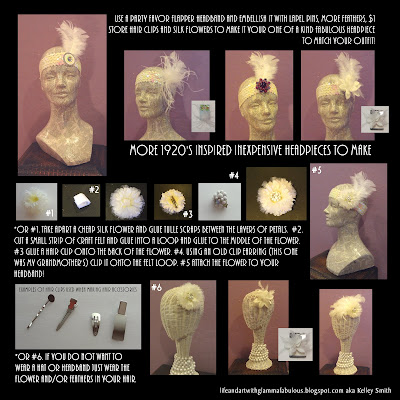
 I am helping put together a Prom for the kids out here in Surprise, AZ. Our theme is "Puttin" on the Ritz"! So to help them get some ideas for headpieces, I made these examples and thought that my friends in the blog world might like to see them and maybe use the ideas for inspiration for future projects. Anyway, it has been great fun putting these items together.
 FABULOUS!
  Then I picked out one ribbon roll from the primary and secondary color groups in both solid and
 Here's how a few of them looked. Aren't they pretty?
 Then I thought why not use old brushes and pencils for the dowels instead? Later I found some dried out markers that would work well also. Just make sure that they fit inside your drawer or storage box BEFORE you glue everything together. (Oh yes I did! Ugh, thank heavens I only glued in 1 brush before I glued the rest of them into the other ribbon rolls!)
 Here are the finished ribbon posts inside their drawer. (I actually filled 2 drawers and made
  And the drawer inside the chest...
 and
and  1. Take a page from your local newspaper and unfold it. From one corner, measure and mark 20" to each side.

 4. And cut one piece of terry cloth fabric. (The terry cloth will absorb spills and an occasional drool) I was able to cut 8 triangles out of a beach towel that was on clearance for the terry cloth fabric. It was much cheaper that buying the fabric by the yard.
 5. With right sides together, sew a 1/2" seam all the way around leaving a opening of about 8".
 6. Cut off the corners and turn the kerchief right side out.
  The Kerchief is reversible. I tried to find basic colors that were not gender specific. I think that this is a fabulous service project that you can work on alone, as a family or use as a beginner sewing project. It's also fun to hang out with girl friends and sit, sew and visit for a good cause. I know that you will have no problem finding a facility that needs these kerchiefs desperately. If you don't know of one, I'd be glad to help you get them where they need to be.
 Here's my pattern for you to use and/or modify:


 I tested out my two inch flower punch on the


 These skeletons could use some clothes.

 The skeletons can be taped on the wall, or you could attach some sticky magnets on the back for your refrigerator.


