Recently I have googled "
Halloween yard decorations" for ideas and found some
FABULOUS sites that celebrate Halloween all year long
and some
AMAZING websites where prop artists share photos and give instructions how to make their creations. The site that intrigued me the most and got my creative juices going was
Scott A. Stoll's Stolloween.com 
Scott is a master artist in design and in creating creatures and things made out of
papermache. He is generous in sharing techniques and what products to use. So I saw his skull with a candle on top and wanted to make one for "Edgar Allen Poe's Library" (a Halloween story that I will share with you soon.) Anyway, I took a cheap plastic skull that I already had and attached a glass votive to the top with E6000 glue.

I taped the glass on to secure it so that it would not slip off in the process.

I then dripped hot glue all around the glass starting at the bottom and working up. This took a few hours as the glue needed to cool between the layers to create a look of a candle that has been burning a long time. In the photo above is the picture of Scott's skull. (He
made his skull and candle. Isn't it
awesome?!!)

After I was done with the hot glue, I antiqued the skull and candle first with brown then some dark grey. When the antiquing was dry, I dry brushed the skull and candle with ivory and a little white to bring out the details.
One thing I have learned over the years, is that when you are making an object in a class or following someone else's pattern, you need to put the original photo or plans away before you are finished so 1.You don't feel like you did a bad job because it doesn't look exactly like the original and 2. You are more inclined to add your own style and personal touches. I feel doing this helps you to be more creative and ideas come faster.
So THANK YOU Scott for sharing. I have shown your site to my older kids and glamchildren and everyone wants to make some more Creepy and Cool Halloween decorations!
Ooooops! I made a MISTAKE! I got this comment from Scott:
Hey Kelley, great website...thanks for leaving the nice comment on my site...the skull with the candle looks great but...I believe your source of inspiration is from Kurt at Grimvisions.com. No hard feelings, lol, just wanted to make sure credit is given where credit it due. Thanks, Scott 
 This year I added a few photos for Dracula to gaze upon when he has time to "think"...
 An old photo of the Counts childhood home and his very first formal portrait as a child keeps Dracula's mind from "concentrating too much". To add humor while he labors, he reminisces about his friend from Sesame Street, New York.
 Alongside of his many prescriptions, the Count likes to recall the days when a tan was in fashion...
 Dracula's Throne awaits the next occupant.


 I then googled "vintage travel ads" so that Norman could spruce up the place.
 It's hard to keep the establishment clean and Norman's mess got on the soap dish...
 and on the towels...
 and what hotel would be complete with out travel soaps and a souvenir shop.
 There is a real company that sells
 So
So 


 I included a blank head just in case there are some artists who don't like to follow a pattern.


 These skeletons could use some clothes.

 The skeletons can be taped on the wall, or you could attach some sticky magnets on the back for your refrigerator.
  First I needed some tiny gravestones. So I recycled some $1 store ones and made a few new ones.
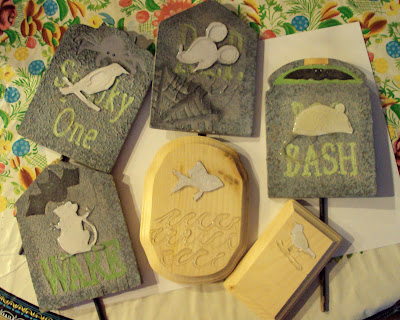 I then used my glue gun to adhere the paper and added some detail with the glue. I let that all dry and painted the whole surface in gray. I then added some detail with white using a fine brush. After I let that dry. I "dry brushed" the surface to add more detail and create a weathered look.
 The story? This mean cat has eaten two birds, three mice and a goldfish. Naughty kitty...but look.. there are two bold mice hiding behind one of the gravestones. CREEPY! My


