I was inspired recently at my baby girl's baby shower for her anticipated July delivery of her first baby girl. Everything was ruffled! While it has been a long standing "family
etiquette tradition" that a child does not wander around in just diapers, diaper covers are hard to find. Especially cute ones (yes, you can find them online, but they are pricey) so I have been sewing. This little pink
leopard shouts FABULOUS and is for Phoebe when she arrives. It is a newborn size.

I bought this
onesie at
Walmart for $3.50. I added the ruffles and made the headband to match. It's for Chelsea's baby, Pearl.

And this fabulous zebra number will be either be for Carma or Daisy, whoever it fits best. I made a hair clip this time
because the 2 year
olds don't like the elastic bands for some reason.

Well, it's back to sewing, I have more
glamdaughters and shower gifts coming up. I just love sewing these small items... The fun fabrics and easy patterns make them instant
gratification. Yeah!
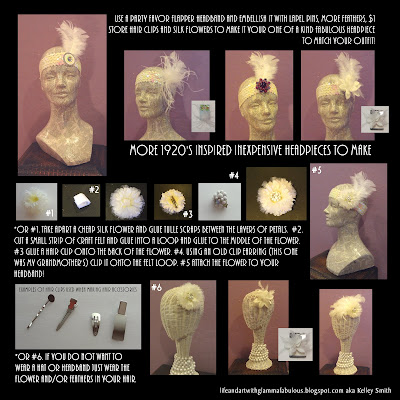
 I am helping put together a Prom for the kids out here in Surprise, AZ. Our theme is "Puttin" on the Ritz"! So to help them get some ideas for headpieces, I made these examples and thought that my friends in the blog world might like to see them and maybe use the ideas for inspiration for future projects. Anyway, it has been great fun putting these items together.
 FABULOUS!


 Then I picked out one ribbon roll from the primary and secondary color groups in both solid and
 Here's how a few of them looked. Aren't they pretty?
 Then I thought why not use old brushes and pencils for the dowels instead? Later I found some dried out markers that would work well also. Just make sure that they fit inside your drawer or storage box BEFORE you glue everything together. (Oh yes I did! Ugh, thank heavens I only glued in 1 brush before I glued the rest of them into the other ribbon rolls!)
 Here are the finished ribbon posts inside their drawer. (I actually filled 2 drawers and made
  And the drawer inside the chest...
 and
and 
 1. Take a page from your local newspaper and unfold it. From one corner, measure and mark 20" to each side.

 4. And cut one piece of terry cloth fabric. (The terry cloth will absorb spills and an occasional drool) I was able to cut 8 triangles out of a beach towel that was on clearance for the terry cloth fabric. It was much cheaper that buying the fabric by the yard.
 5. With right sides together, sew a 1/2" seam all the way around leaving a opening of about 8".
 6. Cut off the corners and turn the kerchief right side out.
  The Kerchief is reversible. I tried to find basic colors that were not gender specific. I think that this is a fabulous service project that you can work on alone, as a family or use as a beginner sewing project. It's also fun to hang out with girl friends and sit, sew and visit for a good cause. I know that you will have no problem finding a facility that needs these kerchiefs desperately. If you don't know of one, I'd be glad to help you get them where they need to be.
 And while my daughter Devan was here the last couple weeks, she and Kelli have been going WILD stenciling
 these are for Conway.
 It is a dream come true that my girls like to do crafts. It is one
  Yeah!
Yeah! This is Carma "posing" in her new outfit for me.

 Then I thought it would be fun to have a design page...
 And then I remembered all the cute little
  I think it will be fun in 10 years to look back at the sewing projects I have made, and maybe my future great grandchildren will laugh at the "out of date" or "retro" fabric I am using today. If you think you can use these project sheets, please enjoy. Otherwise, you can join the rest of my family in thinking I went a little
 But before I can put my sewing machine away, I need to make a bed skirt out of this material...


 I went to
  I researched costume patterns and put together these instructions that I thought I'd pass on to you. The first sheet contains a simple tunic and vest guidelines that you measure to the people in your family. Below are a few non-sewing ideas that I found.
 On Christmas Eve, we have the glamkids dress up and Glampa reads from Luke about the Savior's birth. This year I'll have these "fancy" costumes, but it is just as meaningful to just read the story without the costumes as a family. It is also fun to tell the kids to go put together outfits and props from around the house. It's cute to see a child wrapped in a sheet or towel and caring a perfume bottle as one of the three kings, or pinning a paper tail and ears on to be a donkey... Hope these instructions can be of use to you!
 I almost forgot, above are a few "head hole" ideas. Just remember to cut small, then cut the opening larger if you need to. (mistake made, lesson learned already.)


 Posts
Posts


