 |
| Make a Smilebox slideshow |
Friday, October 30, 2009

Thursday, October 29, 2009
Halloween Story #6 "Small Tales in the Cemetery"
Small Tales in the Cemetery starts with my perusing the Internet for Halloween decoration ideas. I found this idea using plastic pink flamingos, so then I found a site to buy them and lo and behold, they actually sell more colors than pink! I bought a pair of black ones and within a couple days they were in a box on my front porch.  I painted the beaks and eyes black and proceeded to paint flamingo skeletons on each side. My family brought it to my attention that Gnomes, plastic squirrels and other plastic yard ornaments could be altered the same way! So that will be a story for next year.
 Glamson Slade always likes to help me decorate and he willingly obliged by pouring red paint on the underside of a worn out black bird.
 This small tale starts on one side of the entry way with a group of birds waiting to peck someone...
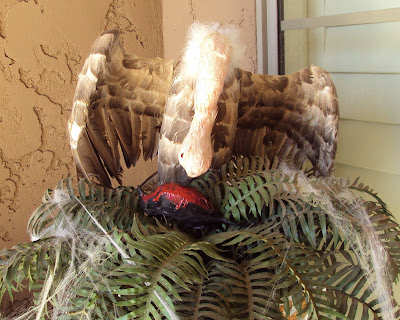
 and ends on the other side of the entry way with the vulture eating one of those birds. Yuck!
 And the last small tale is one of imprisonment. This unlucky lady has been locked in her chair for centuries.
 and the gate keeper holds the keys. He also has been waiting a very long time.
 Happy Haunting!
I painted the beaks and eyes black and proceeded to paint flamingo skeletons on each side. My family brought it to my attention that Gnomes, plastic squirrels and other plastic yard ornaments could be altered the same way! So that will be a story for next year. Glamson Slade always likes to help me decorate and he willingly obliged by pouring red paint on the underside of a worn out black bird.
 This small tale starts on one side of the entry way with a group of birds waiting to peck someone...and ends on the other side of the entry way with the vulture eating one of those birds. Yuck!And the last small tale is one of imprisonment. This unlucky lady has been locked in her chair for centuries.and the gate keeper holds the keys. He also has been waiting a very long time.Happy Haunting!
Tuesday, October 27, 2009
Halloween Story #5 "Visit The Wicked Museum"
Take time to visit The Wicked Museum. The gallery has a collection of objects of the people from the great land of OZ.  Notes of interest include The Wicked Witch of the West's personal belongings. Her broom is parked by a display that features a cherished baby photo, her black pointy hat given to her by her friend Galinda long before the terrible days. Also shown are her boots worn over the years. (I took a black and white photo of myself as a baby and tinted the skin green. The boots were my Great Great Grandmothers.)
 Elphaba's (known later as the Wicked Witch of the West) belongings were donated by The Historical Society of OZ.
 Below is an old childhood art project.
 These small boots were worn by Elphaba when she was a very small child. (originally my Great Grandmothers. Isn't that fabulous that my Grandmother saved them?!)
 A keepsake photo that Galinda gave Elphaba while at Chiz University.
 Galinda (Glinda the Good Witch) belongings were donated by The Junior League of OZ.


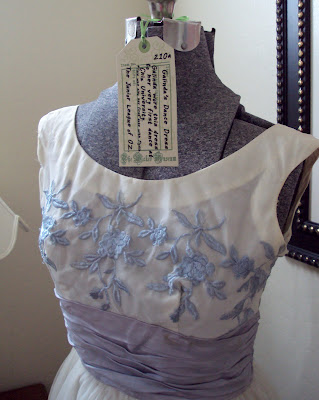 Glalinda's party dress was bought by my daughter for a prom years ago. I'm glad she kept it.
Notes of interest include The Wicked Witch of the West's personal belongings. Her broom is parked by a display that features a cherished baby photo, her black pointy hat given to her by her friend Galinda long before the terrible days. Also shown are her boots worn over the years. (I took a black and white photo of myself as a baby and tinted the skin green. The boots were my Great Great Grandmothers.) Elphaba's (known later as the Wicked Witch of the West) belongings were donated by The Historical Society of OZ.Below is an old childhood art project.These small boots were worn by Elphaba when she was a very small child. (originally my Great Grandmothers. Isn't that fabulous that my Grandmother saved them?!) A keepsake photo that Galinda gave Elphaba while at Chiz University.Galinda (Glinda the Good Witch) belongings were donated by The Junior League of OZ.Glalinda's party dress was bought by my daughter for a prom years ago. I'm glad she kept it.
fun stuff...
Halloween Story #4 "Powder Your Nose in Dracula's Bathroom"
Take a potty break and powder your nose in Dracula's bathroom.  This year I added a few photos for Dracula to gaze upon when he has time to "think"...
 An old photo of the Counts childhood home and his very first formal portrait as a child keeps Dracula's mind from "concentrating too much". To add humor while he labors, he reminisces about his friend from Sesame Street, New York.
 Alongside of his many prescriptions, the Count likes to recall the days when a tan was in fashion...
 Dracula's Throne awaits the next occupant.

This year I added a few photos for Dracula to gaze upon when he has time to "think"... An old photo of the Counts childhood home and his very first formal portrait as a child keeps Dracula's mind from "concentrating too much". To add humor while he labors, he reminisces about his friend from Sesame Street, New York.
 Alongside of his many prescriptions, the Count likes to recall the days when a tan was in fashion...Dracula's Throne awaits the next occupant.
Halloween Story #3 "Check Out Edgar Allan Poe's Library"
 Check Out a book in Edgar Allan Poe's Library. Perched on the desk, the Raven watches over Edgar's unfinished manuscript. (The pen seems to move itself in desperation to finish...)
 Edgar keeps a bust of his infamous comrade Vincent Price. Alongside of this likeness sets a penned photo that reads "For my good friend Edgar. Warmest Regards, Vincent"
 And the light from the flickering candle illuminates the room with an eery gloom of despair...
Creepy!!!
Monday, October 26, 2009
Halloween Story #2 "Welcome to the Bate's Motel"
 Welcome to the Bate's Motel! Yes, I am a conservative glamma who loves a little gore... I googled the movie Psycho images and found this sign. I printed it onto glossy photo paper and painted over the letters with a gel gloss to make the letters stand out.
 I bought the shower curtain and rug at Savers. I put red gloss acrylic onto my hands and feet to make the scary bloody effect. It ended out a little gruesome so I needed to add some "fun" elements to the room...
 Hence, "Norman's Photo Collection". I aged and dirtied up the photos and taped them onto the mirrors in a hap-hazard way in which Norman would have placed them. Then my mind started really going and I thought I'd add the movie "Mommie Dearest" into the story/crime scene. I thought that Norman could have an Aunt Joan and Cousin Christina. Oh, and of course Uncle Alfred!
 I then googled "vintage travel ads" so that Norman could spruce up the place.
 It's hard to keep the establishment clean and Norman's mess got on the soap dish...
 and on the towels...
 and what hotel would be complete with out travel soaps and a souvenir shop.
 There is a real company that sells Bate's Motel towels. Click here if you are interested.
Extra toilet paper is available if you need it!!!
Wednesday, October 14, 2009
Oooops! I made a MISTAKE!
I received a comment from Scott at Stolloween.com and He brought it to my attention that the inspiration for my Skull with Candle was actually made by Kurt from Grimvisions.com ! Kurt's site is equally FABULOUS!!! (this mistake happens when you are searching images and you copy them and forget to write down the source... I WILL do better! So THANK YOU KURT for your wonderful site and like Scott, your generosity in sharing your ideas and skills. Click on Kurt's LOGO below to visit his AMAZING website.

So THANK YOU KURT for your wonderful site and like Scott, your generosity in sharing your ideas and skills. Click on Kurt's LOGO below to visit his AMAZING website. Halloween Skull with Candle
Recently I have googled "Halloween yard decorations" for ideas and found some FABULOUS sites that celebrate Halloween all year long and some AMAZING websites where prop artists share photos and give instructions how to make their creations. The site that intrigued me the most and got my creative juices going was Scott A. Stoll's Stolloween.com  Scott is a master artist in design and in creating creatures and things made out of papermache. He is generous in sharing techniques and what products to use. So I saw his skull with a candle on top and wanted to make one for "Edgar Allen Poe's Library" (a Halloween story that I will share with you soon.) Anyway, I took a cheap plastic skull that I already had and attached a glass votive to the top with E6000 glue.
 I taped the glass on to secure it so that it would not slip off in the process.
 I then dripped hot glue all around the glass starting at the bottom and working up. This took a few hours as the glue needed to cool between the layers to create a look of a candle that has been burning a long time. In the photo above is the picture of Scott's skull. (He made his skull and candle. Isn't it awesome?!!)
 After I was done with the hot glue, I antiqued the skull and candle first with brown then some dark grey. When the antiquing was dry, I dry brushed the skull and candle with ivory and a little white to bring out the details.
Scott is a master artist in design and in creating creatures and things made out of papermache. He is generous in sharing techniques and what products to use. So I saw his skull with a candle on top and wanted to make one for "Edgar Allen Poe's Library" (a Halloween story that I will share with you soon.) Anyway, I took a cheap plastic skull that I already had and attached a glass votive to the top with E6000 glue. I taped the glass on to secure it so that it would not slip off in the process.
 I then dripped hot glue all around the glass starting at the bottom and working up. This took a few hours as the glue needed to cool between the layers to create a look of a candle that has been burning a long time. In the photo above is the picture of Scott's skull. (He made his skull and candle. Isn't it awesome?!!)After I was done with the hot glue, I antiqued the skull and candle first with brown then some dark grey. When the antiquing was dry, I dry brushed the skull and candle with ivory and a little white to bring out the details.
One thing I have learned over the years, is that when you are making an object in a class or following someone else's pattern, you need to put the original photo or plans away before you are finished so 1.You don't feel like you did a bad job because it doesn't look exactly like the original and 2. You are more inclined to add your own style and personal touches. I feel doing this helps you to be more creative and ideas come faster.
So THANK YOU Scott for sharing. I have shown your site to my older kids and glamchildren and everyone wants to make some more Creepy and Cool Halloween decorations!
Ooooops! I made a MISTAKE! I got this comment from Scott:
Hey Kelley, great website...thanks for leaving the nice comment on my site...the skull with the candle looks great but...I believe your source of inspiration is from Kurt at Grimvisions.com. No hard feelings, lol, just wanted to make sure credit is given where credit it due. Thanks, Scott
Friday, October 9, 2009
Paper Halloween Skeleton Pattern
I am working on some more "Halloween Stories" to share with you. Meanwhile, here is a skeleton that I drew for the glamkids to make and thought that somebody out there might want to make these for their ghoulchildren also. Just right click on the image and save it into one of your files on your computer. (I know most of you already know how to do this, but someone had to tell me once...)  I included a blank head just in case there are some artists who don't like to follow a pattern.
 You only have to copy each page once EXCEPT the bones below need to be printed twice since two bones are needed for each arm and each leg. (cardstock works best)


 These skeletons could use some clothes.


 The skeletons can be taped on the wall, or you could attach some sticky magnets on the back for your refrigerator.
I included a blank head just in case there are some artists who don't like to follow a pattern. You only have to copy each page once EXCEPT the bones below need to be printed twice since two bones are needed for each arm and each leg. (cardstock works best)
 These skeletons could use some clothes.The skeletons can be taped on the wall, or you could attach some sticky magnets on the back for your refrigerator.
 Have fun! I'd LOVE it if you sent me a photo of your creations!
Subscribe to:
Posts (Atom)


